How to Set Up Tent for Camping: Step-by-Step Guide
You’ve just pulled into your campsite after a long drive. The sun is dropping fast, and you’re standing in front of a pile of fabric, poles, and stakes, wondering where to start. Knowing how to set up a tent for camping is one of those skills that separates a relaxing night under the stars from a frustrating hour of fumbling in the dark.
Manufacturer specifications indicate that a typical three-person dome tent should take between 5 and 12 minutes to pitch once you know the sequence. The difference between a five-minute setup and a twenty-minute struggle comes down to understanding a handful of visual cues and physical steps. Let’s walk through each one so your next camp night starts the right way.
Quick Answer
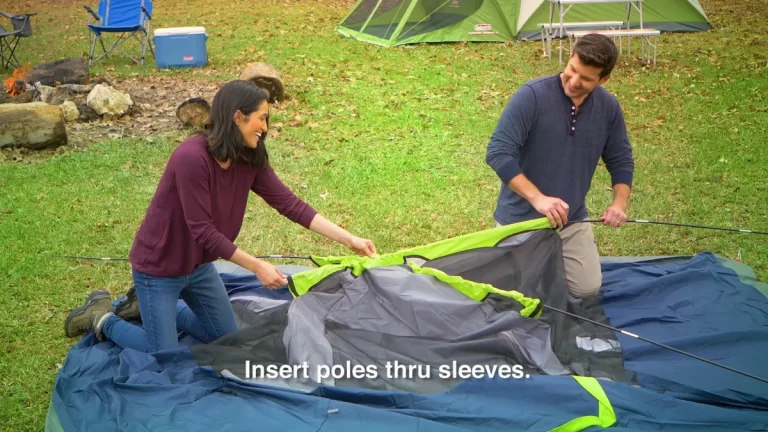
Lay out your footprint first. Assemble the poles and lay them across the tent body. Thread or clip each pole through its matching sleeve or clip.
Raise the tent by lifting the poles at the hub. Stake down the four corners at a 45-degree angle. Drape the rainfly over the top. Top Amazon Coleman Tents Coleman Sundome Tent.
Clip it to the pole ends. Stake out the guy lines taut. Adjust tension on every strap.
Why Getting the Setup Right Matters More Than You Think

A poorly pitched tent doesn’t just look sloppy. It leaks when it rains. It flaps all night in the wind.
It pools water under your sleeping bag. According to aggregate reviews from thousands of campers, the most common complaint about a ruined trip isn’t bad weather, it’s gear that wasn’t set up correctly in the first place.
The geometry of a tent is designed to shed water and handle wind loads. When you skip a step or rush through the sequence, you compromise that geometry. A rainfly that isn’t pulled taut will sag and collect water.
A footprint that sticks out past the tent floor will channel rainwater underneath you. Stakes driven straight down instead of at an angle will pull out with the first strong gust.
Getting the setup right also means you can take it down faster the next morning. Tensioned fabric folds neatly. Tangled poles come apart easily.
You spend less time wrestling with gear and more time actually camping. As of 2026, the average camper pitches a tent roughly 12 times per season. That’s 12 opportunities to build muscle memory or 12 chances to repeat the same mistakes.
What You’ll Need Before You Start (Tools, Not Just the Tent)
Before you unzip that stuff sack, gather everything you’ll need. Digging through your car halfway through setup is how poles get bent, and stakes get lost.
What comes with the tent:
- Tent body (inner mesh or solid fabric)
- Rainfly (the waterproof outer layer)
- Pole set (usually 2 to 4 poles, depending on design)
- Stake bag (typically 8 to 12 stakes)
- Guy lines (usually pre-attached to the rainfly)
- Pole repair sleeve (small tube for emergency splints)
What you should bring separately:
- Tent footprint or ground cloth (tarp cut to size)
- Mallet or hammer (for hard or rocky ground)
- Extra stakes (lightweight aluminum or heavy-duty for wind)
- Headlamp or flashlight (because setup always takes longer than you think at dusk)
One thing that surprises most first-time campers: your tent’s stuff sack is not storage. It’s a compression sack for transport. Storing your tent stuffed in that sack long-term crushes the fabric along the same fold lines and degrades waterproof coatings.
Store it loose in a cotton bag or pillowcase between trips.
Step 1 – Picking the Right Spot (Level, Clear, and Safe)
The best tent in the world won’t save you from a bad campsite. Spend the first few minutes choosing your ground carefully.
Look for these three things:
- Level ground. A slight slope is okay if you sleep with your head uphill. Anything more than about 5 degrees will have you sliding toward the tent wall all night.
- Clear surface. Walk the area barefoot or in socks. You’re looking for rocks, roots, pinecones, and sticks that will poke through your floor. Clear them before you lay anything down.
- Natural drainage. Avoid low spots where water collects after rain. Look for slightly higher ground with a gentle slope away from your tent. Grass that looks darker green or has standing leaves is a red flag.
What to avoid:
- Directly under dead branches or widowmakers (hanging dead limbs)
- The base of a single tall tree in an open field (lightning risk)
- Game trails or animal paths (you will get visited at 3 AM)
- Ant hills, wasp nests, or poison ivy patches
The National Park Service recommends setting up at least 200 feet from any water source. This protects both the water quality and your sleep. Rivers and lakes attract wildlife at night, and the ground near water is usually damp or flooded in heavy rain.
Step 2 – Laying the Foundation: Footprint or Groundsheet
Your tent floor is tough, but it’s not invincible. A footprint adds a layer of protection against punctures, abrasion, and ground moisture. Some tents come with a custom-shaped footprint.
Others expect you to buy one separately or use a generic tarp.
If you’re using a tarp instead of a custom footprint:
Fold or cut it so it’s about 1 to 2 inches smaller than your tent floor on every side. This is critical. A footprint that sticks out beyond the tent floor will catch rainwater and funnel it directly underneath your tent.
That’s how you wake up in a puddle even though the rainfly is perfect.
How to lay it:
- Smooth the footprint flat on your chosen spot
- Make sure there are no wrinkles or folds underneath
- Weight the corners with a rock or your pack if it’s windy
- Position it so the tent will sit centered on top
Some campers skip the footprint entirely to save weight. If you’re backpacking and every ounce matters, that’s a tradeoff you can make. But for car camping, there’s no reason to skip it.
A $30 footprint or a $5 tarp protects a $200 tent floor from a $2 rock that would otherwise tear a hole.
Step 3 – Assembling the Poles Without Tangling Yourself
Poles are the skeleton of your tent. Treat them carefully. A bent or broken pole means a sagging tent or a complete failure in the wind.
The right way to assemble poles:
- Remove the pole bag and lay all poles flat on the ground
- Identify each pole by its color-coded sections or by length
- Connect the sections end to end, pushing firmly until each ferrule clicks or seats fully
- Never force a connection. If it doesn’t slide together easily, check for dirt or a bent ferrule
Most three-season dome tents use two main poles that cross at the top. Four-season tents use three or four poles that cross in a geodesic pattern. Instant tents have pre-bent poles connected at a central hub system that snaps into place.
Common mistake to avoid:
Don’t let the pole sections twist while you’re joining them. Twisting puts stress on the shock cord inside. Over time, that internal cord snaps, and suddenly you have a pole that won’t snap together at all.
Line up the sections straight and push, don’t twist.
If you’re setting up alone:
Place one end of each pole into its grommet before you start attaching the tent body. This holds the poles in position while you work your way around the tent. It’s a small trick that saves you from chasing poles across the campsite every time the wind picks up.
For those looking for reliable outdoor gear, you might also want to review the correct fluid level for any camping equipment with small engines or the routine upkeep of your campsite gear to ensure everything performs well on your trip.